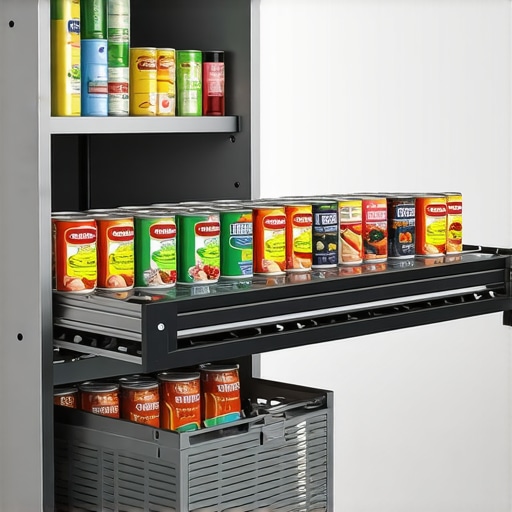
7 Slim Pull-Outs That Turn a 6-Inch Gap Into a Canned Good Goldmine
I remember the exact moment I realized I was leaving money—and valuable space—on the table every time I opened a shallow cabinet door and peered into that frustrating six-inch gap. It was a typical weekend, and I was rummaging through my kitchen trying to find a spice or a can of soup. Instead of grabbing what I needed, I found myself sidetracked, pulling out awkwardly stacked cans and digging through layers of clutter. That tiny gap suddenly felt like a black hole, swallowing my patience and precious seconds. It struck me then: why do I have these gaps in my custom cabinets, and how could I turn this wasted space into something useful?
The answer came in the form of slim pull-out storage solutions—specifically designed to transform those 6-inch gaps into a goldmine for canned goods and essentials. This realization was a lightbulb moment, inspiring me to rethink my entire approach to kitchen storage. I dove into researching options, realizing that efficient use of every inch isn’t just a luxury; it’s essential for maximizing limited space, especially in smaller kitchens.
Today, I want to share what I’ve learned. Whether you’re in the middle of a remodel or just looking to optimize what you already have, these 7 slim pull-outs can make a significant difference. They’re budget-friendly, practical, and surprisingly straightforward to implement. Imagine pulling out a dedicated shelf for cans or snacks—no more digging, no more frustration. Your kitchen can become a model of efficiency and organization without tearing out your cabinets.
But before we get into the具体 details, let’s address a common question: is installing these slim pull-outs really worth the effort? I’ll admit, I initially had doubts myself. Early on, I made the mistake of assuming I’d need custom carpentry skills or a full kitchen overhaul. In reality, many of these solutions can be added with simple tools and some thoughtful planning. The key is knowing where and how to use them for maximum impact.
If you’ve ever been annoyed by those hard-to-reach gaps in your cabinets, you’re not alone. According to a study by the National Kitchen and Bath Association, proper storage solutions can improve kitchen functionality by up to 40%. So, why leave those spaces neglected? Let’s explore how you can turn those unassuming six inches into an organized, accessible, and useful part of your kitchen.
Identify the Perfect Spots for Slim Pull-Outs
Start by examining your kitchen cabinets, focusing on the shallow 6-inch gaps where your cans, spices, or small items tend to pile up. Use a tape measure to confirm the width and depth, ensuring the pull-out will fit snugly without interfering with cabinet doors or hinges. I recall the first time I measured under my sink; I found a tiny space that had been wasted for years. That measurement became my blueprint for custom-sized pull-outs, which drastically improved my storage efficiency.
Choose the Right Hardware and Materials
Select high-quality slide rails designed for slim drawers. Heavy-duty, soft-close slides like the ones detailed here ensure smooth operation and durability under weight. For materials, opt for sturdy plywood or recycled ocean plastic if you prefer eco-friendly options—these resist warping better than MDF, especially in humid kitchens. I learned that budget slides wear out quickly; investing in solid hardware pays off over time, reducing frustration and rework.
Design and Build Your Custom Pull-Outs
Create a plan to cut or order custom inserts that match your measured spaces. Think of this process as building a miniature bookshelf tailored to your cabinet’s dimensions—every inch counts. Use a circular saw, jig, or pre-made kits for a clean finish. When I built mine, I used a simple carpentry set, and the most critical step was sanding the edges flawlessly with a detail sander for a perfect fit. Remember, precise measurement and careful assembly prevent misalignments that could cause jamming.
Prepare Your Cabinet for Installation
Before installing, clear out your cabinet and remove any obstacles. Use a level to check the cabinet’s walls and floor, especially if you’re dealing with an uneven surface. For uneven walls, you can scribe the cabinet to the wall using a rabbet plane or scribing tool (see this guide), ensuring the pull-out runs smoothly without gaps or catching.
Attach the Pull-Out Mechanism
Install the slides inside the cabinet, securing them with screws according to the manufacturer’s instructions. Use a drill with a screwdriver bit for efficiency. Pay attention to alignment; the slides must be perfectly parallel for smooth extension. I found that marking the screw holes beforehand helps maintain alignment and reduces the chance of skewed installation. Test the movement multiple times, adjusting screws as needed until the pull-out glides effortlessly.
Insert and Finalize
Insert your custom shelf or organizer into the slide rails. Confirm it’s seated properly and functions smoothly. Finish by attaching any handles or pulls, making sure they are aligned and secure. Once installed, load the pull-out with your stored items, and enjoy a clutter-free, highly accessible space. Remember, periodic maintenance—like tightening screws and cleaning slides—will prolong the life of your new storage solution.
Many homeowners assume that selecting custom cabinets or built-ins is merely about aesthetics or fitting the space. However, a common misconception is that more elaborate designs or higher-end materials automatically mean better functionality. In reality, aggressive focus on fancy finishes or intricate details without considering practical nuances can lead to costly mistakes and lost storage opportunities. For example, some believe that investing in solid wood is always best, but in high-humidity kitchens, engineered materials like plywood or MDF often outperform solid wood by resisting warping and expansion. Furthermore, it’s a myth that larger or more ornate cabinets inherently maximize space; in truth, well-planned, smaller built-ins with thoughtful storage solutions, such as modern remodeling techniques and custom-fitted pull-outs, often outperform traditional designs. A significant oversight many make is underestimating the importance of precise measurements—assuming standard sizes will suffice, which results in gaps, misalignments, and inaccessible corners. This is where advanced planning pays off, ensuring each inch functions efficiently.
One mistake is overlooking the importance of hardware quality. For instance, choosing cheap hinges for cabinet doors can cause sagging or misalignment over time. Heavy-duty, soft-close hardware, like the heavy-duty hinges, can extend the lifespan of your investment and improve daily usability.
Are you aware of how the placement of built-ins impacts overall space usage and accessibility? Improper planning can turn what should be functional storage into a cluttered, hard-to-reach mess. Advanced homeowners often ask: “How can I tailor my built-ins to adapt to my unique lifestyle and space constraints?” This question opens the door to personalized solutions, from pull-out pantry shelves to hidden compartments, emphasizing the importance of aligning design with the specific needs of your household.
A common trap is neglecting to consider future maintenance or upgrades. Materials that look stunning today might become problematic after a few years if they lack durability or are hard to access for repairs. For example, choosing finishes that resist fingerprints and smudges, like matte black hardware, can save time and frustration, as highlighted in this article.
So, the next time you’re designing or remodeling with custom cabinets, remember that understanding the pitfalls and nuances—like material choice, hardware quality, and measurement precision—is essential. Don’t be swayed by superficial appearances; prioritize practical, space-enhancing details that serve your lifestyle. For a deeper dive into elegant storage solutions, check out how to maximize space effectively. Have you ever fallen into this trap? Let me know in the comments.
Invest in Quality Tools for Lasting Performance
Maintaining your custom cabinetry starts with using the right tools. I personally swear by a high-torque cordless drill like the Milwaukee M18 Fuel, which offers the power and precision needed for tightening hinges and securing hardware without damaging delicate surfaces. Pair it with a quality Phillips-head screwdriver for quick adjustments. For finer tasks like aligning doors or scribing to uneven walls, a multi-bit screwdriver and a small spirit level become indispensable. These tools have become staples in my maintenance routine, ensuring that every tweak maintains the integrity of your cabinets over time.
Embrace Smart Maintenance Methods
Adopting a proactive approach ensures your storage solutions stay functional for years. Regularly inspecting and tightening screws, hinges, and slides can prevent minor issues from escalating. I recommend scheduling biannual checkups—don’t wait until a door squeaks or a drawer jams. Applying a silicone-based lubricant to slides and hinges, such as WD-40 Specialist Silicone, keeps mechanisms operating smoothly. Importantly, avoid petroleum-based lubricants that can attract dust and grime, potentially causing more harm than good. Consistent maintenance reduces wear and extends the lifespan of your investments.
Choose Software and Planning Strategies
For those thinking about scaling or future-proofing their space, digital planning tools like SketchUp or Chief Architect can help visualize modifications before committing. I used SketchUp to map out additional built-in features, which helped me identify potential issues early. These programs facilitate precise measurements and allow you to experiment with layouts, ensuring that every inch—like custom pull-outs or corner units—is utilized effectively. As technology advances, integrating smart storage solutions, such as sensor-driven cabinet lighting or automated pull-out systems, is an exciting trend that will become more accessible, further enhancing functionality and user experience.
How do I maintain my built-ins over time?
Maintaining your built-in cabinets over the long term involves routine inspections, adjusting hardware, and addressing wear before it worsens. Use a level regularly to check door alignment and tighten fasteners as needed. Cleaning hinges and slides with a soft cloth prevents dust accumulation. When hardware shows signs of fatigue, replace with high-quality components like those featured here. Planning for future upgrades by documenting your system’s specs allows easy replacements or additions later. Remember, staying vigilant about these small maintenance steps will keep your cabinets looking great and functioning perfectly for years to come.
Looking ahead, integrating IoT-connected hardware or semi-automated systems may be the future of home organization, providing real-time alerts for maintenance needs and optimizing usage. Staying updated with these innovations ensures your kitchen remains both beautiful and highly functional. For more advanced ideas on scaling your storage or upgrading your built-ins, explore the articles on elevating living room functionality and modern remodeling.
Lessons That Took Me Longer Than They Should Have
One of the most valuable insights I gained was realizing that small spaces can have outsized impact—if you approach them with purpose and precision. I used to dismiss shallow gaps as unusable, but once I experimented with custom pull-outs, I saw how much of a difference they made in everyday functionality.
Another lesson was the power of quality hardware. Investing in sturdy, smooth-close slides prevented frustrations down the line, saving both time and money. And lastly, I learned that meticulous planning and measurement are the backbone of successful storage upgrades—rushing often leads to misfits and compromises.
Tools and Resources That Changed My Approach
For anyone ready to take on custom storage solutions, I highly recommend the Milwaukee M18 Fuel cordless drill for reliable power. Pair it with heavy-duty soft-close slides to ensure your pull-outs extend smoothly for years. To plan your layout accurately, using software like SketchUp can help visualize your ideas before cutting into the wood. Lastly, keeping a copy of a guide on material choices helps navigate the best options for durability and environmental impact.
Your Custom Space Is Waiting to Be Optimized
Now, it’s your turn to elevate your kitchen with clever storage solutions. Small adjustments, like adding slim pull-outs to those pesky gaps, can transform your everyday experience into something truly enjoyable. Don’t settle for wasted space or clutter—embrace the possibilities and enjoy a kitchen that works just as beautifully as it looks.
Have you ever struggled with making the most of a tiny cabinet space? Share your story below—I’d love to hear your challenges and wins!