The Secret to Seamless Built-in Bookshelves Around a Fireplace
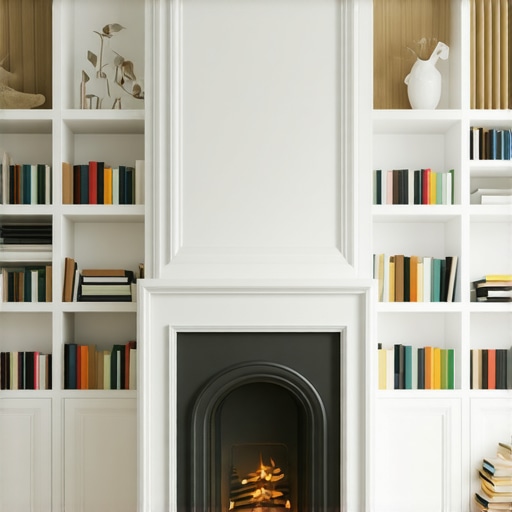
I remember the moment vividly—standing in my living room, surrounded by mismatched furniture and cluttered shelves. I had grand visions of a sleek, integrated look, but as I gazed at the fireplace, I realized something was missing. The space around my fireplace felt awkward, not quite the focal point I desired. That lightbulb moment hit me hard: I needed built-in bookshelves that didn’t just frame my fireplace but became an elegant extension of it. Instead of feeling like an afterthought, the built-ins would serve as a harmonious feature, elevating my entire room.
Why Seamless Built-in Shelving Can Transform Your Space
Seamless integration isn’t just about aesthetics; it’s about creating a unified, functional area where every element works in harmony. When done right, built-in bookshelves around a fireplace can turn a bland wall into a stunning centerpiece. But achieving this look isn’t as simple as installing shelves or casing the fireplace. It requires understanding the nuances of design, measurements, and materials. Trust me, early in my own project, I made a crucial mistake by choosing mismatched materials that cracked under seasonal changes—an avoidable error I’d love to save you from.
This is exactly why mastering the secret to seamless built-ins matters. It isn’t just a trend; it’s a smart way to increase your home’s style and functionality without sacrificing warmth or charm. With the right approach, your fireplace can become the heart of your home, a cozy nook that also boasts impeccable style. Curious about the step-by-step methods that make this possible? I’ll walk you through the process, sharing insights from my experience and expert tips that guarantee a flawless result.
Could this be the project that finally gets your living room where you want it?
Before we dive into the how-to, let me admit: I once believed that my fireplace would look best with simple, traditional surrounds. That was my mistake. I overlooked how custom cabinetry and the right materials could make everything flow, creating a clean, built-in look that elevates your entire space. It’s all about paying attention to those small details, avoiding common pitfalls, and choosing quality over quick fixes. As interior design expert Artisan Cabinetworkz points out, selecting the right materials and planning carefully can help you avoid costly mistakes later.
So, are you ready to learn how to turn your fireplace into a seamless, stylish focal point that adds value and beauty to your home? Let’s get started with the foundational ideas that will set the stage for your perfect built-in setup.
reachedEnd
Measure Precisely and Sketch Your Design
Start by examining your fireplace and the wall space. Use a tape measure to record the width, height, and depth. I once rushed this step and ended up with shelves that didn’t fit snugly against the wall, causing gaps and unevenness. To avoid this, take multiple measurements and sketch a scaled diagram. Mark the exact locations for shelves, accounting for any moldings or protrusions.
Select Materials That Complement Your Home
Choose wood or MDF that matches your existing trim and cabinetry. During my first attempt, I picked a cheap veneer that warped over seasons—but I learned the hard way that material quality affects longevity. Opt for plywood with a good veneer for durability and a seamless look. For finishing, pick a paint or stain that harmonizes with your room’s palette.
Build and Fit the Frame with Precision
Create a sturdy frame that borders your fireplace, using a miter saw for accurate joints. Use clamps to hold pieces tight while the glue sets. I once misaligned a corner and had to redo the entire frame; the lesson was clear—measure twice, cut once. The goal is a flush, tightly fitted frame that looks built-in rather than added on.
Install Shelves with Adjustable Hardware
Use wall anchors and adjustable shelf brackets to allow future tweaks. A key tip is to pre-drill holes to prevent splitting. When I installed my shelves, I used a level to ensure horizontality—small steps that make a big difference. Secure brackets inside the frame, aligning them so the shelves sit perfectly flat. For added support, consider cleats hidden behind the shelves—this creates a seamless appearance and sturdy storage.
Finish with Seamless Trim and Paint
Apply trim that matches your room’s molding for a cohesive look. Use caulk to fill gaps between the frame and wall, then sand smooth. During my project, I had to do several rounds of paint and caulk to hide imperfections—patience pays off here. Finish with a high-quality paint or stain, and consider a clear sealant for added durability.
Iterate and Fine-tune for Perfection
Step back frequently to assess alignment and fit. In one case, I had to sand down a corner that looked slightly off—small adjustments restore harmony. Remember, your built-ins should look as if they grew naturally from the wall, not added later. Taking the time to measure, recheck, and refine ensures a professional, seamless result.
Throughout this process, keep in mind the importance of matching your hardware and finishes to your overall style. For inspiration on combining style with function, visit this resource. The effort invested in these steps will be evident in the final, integrated look of your fireplace surrounds.
When it comes to kitchen renovations and built-in solutions, many homeowners rely on popular advice that may actually hinder their results. One prevalent misconception is the belief that choosing the most affordable materials will save money in the long run. In reality, cheap materials often warp, crack, or deteriorate faster, leading to higher replacement costs. For instance, selecting inexpensive MDF over quality plywood can result in sagging shelves and uneven finishes over time, undermining the very seamless look you aim to achieve.
Why do so many homeowners overlook the importance of detailed measurements and planning?”
This mistake often stems from a desire for quick fixes and impatience. However, a tiny miscalculation can throw off the entire aesthetic, creating gaps, uneven surfaces, or misaligned cabinets. Using outdated measuring techniques or failing to account for wall irregularities can lead to costly adjustments later. Trust me, precise measurements and thorough planning are fundamental—more so than many realize. Dive into expert tips for selecting the best storage solutions here.
Keeping Your Storage Systems in Top Shape
Once you’ve invested time and effort into building custom cabinets or installing seamless built-in shelves, maintaining them properly is essential to ensure they serve you for years to come. Regular check-ups prevent small issues from turning into costly repairs, and using the right tools makes all the difference. I personally swear by a few specific tools that streamline maintenance tasks and help me keep my kitchen pristine.
Essential Tools for Ongoing Care
First, I always keep a quality multi-tool screwdriver set on hand. Its versatility allows me to tighten or replace hinges, adjust drawer slides, and fine-tune hardware without hunting down multiple screwdrivers. I prefer one with magnetic tips—this prevents losing tiny fasteners during adjustments. Secondly, a digital measuring tape is invaluable; it helps me verify that shelves remain level or to double-check spacing after years of settling. Unlike traditional tape measures, my digital version stores measurements, making future adjustments even easier.
Another handy gadget is a cordless orbital sander. Over time, paint or stains may develop tiny chips or scratches, especially in high-traffic areas. Light sanding with a 120-grit pad refreshes the finish and extends the cabinet’s life without the need for complete repainting. For cleaning, I avoid harsh chemicals that might degrade finishes. Instead, I use a microfiber cloth combined with a gentle wood or laminate cleaner—this keeps surfaces looking like new and preserves the integrity of sealants and stains.
Embracing Technology to Simplify Routine Maintenance
In the future, appliance management and cabinet automation might become standard. But for now, software like CabinetVision assists designers and homeowners in iterating designs or scheduling maintenance checks—saving time and avoiding surprises. These digital tools help you visualize updates or replacements, ensuring your storage solutions remain functional and cohesive.
Looking ahead, I predict that smart sensors embedded within cabinets could alert you to humidity levels, detect leaks, or warn when hinges are loosening—adding a new layer of protection for your investment. Companies like artisan cabinetworkz are already exploring such innovations to prolong the lifespan of custom cabinetry and storage units.
How do I maintain built-ins and custom cabinetry over time?
To keep your kitchen storage solutions functioning flawlessly, schedule regular inspections—at least biannually—to tighten hardware, verify alignment, and clean surfaces. Always use appropriate tools—like my favorite magnetic-tip screwdrivers—and avoid overloading shelves, which can cause sagging. Applying a fresh coat of sealant or touch-up stain every few years also helps preserve the finish and prevent moisture damage. For deeper maintenance, consider consulting experts who can advise on refinishing or replacing worn components without a full remodel. Remember, a little proactive care now saves big expenses later. For innovative approaches, check out this resource, which offers expert tips on extending your cabinetry’s lifespan
Rare Mistakes That Cost Me Big
One of the toughest lessons I learned was rushing through measurements. I once installed a shelf only to find it didn’t align properly, throwing off the entire aesthetic. Taking the time for detailed, multiple measurements might seem tedious, but it saves hours—and frustration—in the long run. Never underestimate the power of a carefully drafted sketch; it’s the blueprint for a flawlessly seamless look.
The Magic of Material Choices
I learned that selecting high-quality, matching materials isn’t just about appearance—it’s about longevity. Choosing veneer plywood over cheap MDF meant my built-ins remained durable through seasonal changes, avoiding the warping I faced before. Remember, the right materials elevate your project from good to extraordinary and prevent costly repairs later.
Designing for Function and Style
An important revelation was planning for future access. Incorporating adjustable hardware and hidden cleats made my shelves versatile and sleek. It’s tempting to focus solely on looks, but thoughtful function ensures your built-ins serve you well for years. This balance between aesthetics and practicality is the secret sauce that transforms a good project into a home upgrade.
The Power of Fine-Tuning
Patience during installation is crucial. I often stepped back to assess alignment, fixing small imperfections that could otherwise disturb the seamless flow. Small tweaks—like sanding a slight misalignment or repainting a section—accumulate into a professional finish. It’s all about the details; they make the difference between a DIY job and a custom masterpiece.
Turning Knowledge Into Confidence
My biggest takeaway is that preparation and education are your best allies. Reading expert resources and trusting reputable sources—like this guide on storage solutions—help you avoid rookie errors. When you approach your built-ins with patience and strategy, the result isn’t just beautiful; it’s enduring.
Ways You Can Elevate Your Space Today
Don’t wait until everything is perfect to start. Begin with detailed measurements and draft your design to visualize the final look. Choose materials that match your aesthetic and stand the test of time. Remember, every small step adds up—making your kitchen remodel a rewarding journey rather than a stressful task. Ready to turn your fireplace into a seamless centerpiece? Dive into those measurements and start planning—your dream space is within reach. Have you ever struggled with measuring or material selection? Let me know below, and I’ll help you troubleshoot.