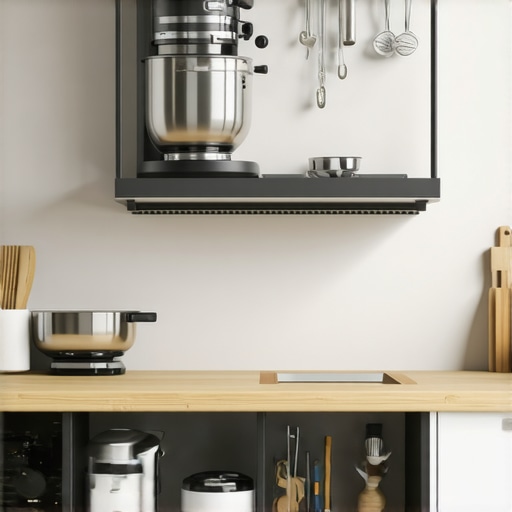
Why Your Stand Mixer Belongs on a Swing-Up Shelf Instead of the Counter
I vividly remember the day I finally decided to move my beloved stand mixer off the cluttered kitchen counter. It was after I knocked over a jar of pasta sauce, spilling it all over my recently cleaned surface, and realizing that my mixer wasaming as a constant obstacle rather than an asset. That lightbulb moment made me question why I was letting my favorite appliance sit front and center when it was hardly ever in use. The truth is, most of us keep bulky mixers out of habit, not because they need to be there.
Transform Your Kitchen by Rethinking Appliance Placement
Many of us struggle with counter clutter, and the mixer often becomes the poster child for ineffective storage. It’s heavy, awkward, and takes up prime real estate that could be better utilized for prepping or displaying beautiful cookware. I learned that by simply elevating my mixer onto a swing-up shelf, I freed up space instantly. This change not only creates a cleaner look but also reduces the temptation to leave appliances out, encouraging better organization. Want to learn how to do this yourself? Today, I’ll guide you through practical, realistic steps to shift your mixer off the counter and into a smarter storage spot.
Is a Swing-Up Shelf Really Worth the Hype?
Early on, I was skeptical. I thought, “Will I really remember to swing it down when I need it?” My mistake was underestimating how functional a dedicated storage solution could be. Once installed, I found it incredibly convenient, and over time, I appreciated the extra counter space during meal prep. Plus, it kept my mixer protected from accidental knocks—and it looked neat! The key? Proper placement and quality hardware make all the difference. Want to see other space-saving ideas? Check out [smart storage ideas to maximize your kitchen space this year](https://artisancabinetworkz.com/smart-storage-ideas-to-maximize-your-kitchen-space-this-year).
Facing a similar clutter conundrum? If so, you’re not alone. Many homeowners realize that rethinking appliance storage can truly revolutionize their kitchen experience. Now, let’s explore how you can make this solution work for your space, starting with choosing the right shelf system that fits your needs and style.
Measure and Plan Before Drilling
Start by taking precise measurements of your mixer and the space where you want to store it. Use a tape measure to find the exact dimensions, adding a little extra clearance to allow for easy placement and removal. I once tried to install a built-in shelf in a cramped corner without measuring—resulting in a shelf that barely fit the mixer, forcing me to redo the entire project. To avoid repeating my mistake, create a detailed sketch or use paper templates to visualize the setup. Check out expert tips on selecting storage solutions to help you choose the best approach for your space.
Choose the Right Hardware and Materials
Select sturdy brackets or custom brackets that can support the weight of your mixer, which can sometimes be over 15 pounds. Opt for moisture-resistant plywood or hardwood to ensure durability, especially in kitchens prone to humidity. When I built my first pull-out shelf, I underestimated the importance of heavy-duty slides; it sagged after just a few months. Since then, I’ve moved to heavy-duty ball bearing slides rated for more weight. If you’re unsure about selecting appropriate hardware, this guide offers detailed advice on hardware choices.
Build the Shelf or Cabinet Box
Using your measurements, cut the wood to size, ensuring smooth edges with fine-grit sandpaper. Assemble the box using durable wood glue and screws for added strength. Think of this step like building a sturdy frame for your favorite artwork—precision and quality ensure longevity. I once cut corners by skipping proper measurement, which led to a crooked shelf that was frustrating to fix later. To avoid this, double-check all cuts before assembly and consider using a square for accuracy.
Incorporate Support and Reinforcement
Reinforce the shelf with vertical supports or brackets underneath to prevent sagging when loaded with your mixer. For heavier units, add cross supports to distribute the weight evenly. During my project, I added metal L-brackets to support the shelf, which transformed a flimsy piece into a robust storage zone. Reinforcements like these ensure that your solution withstands daily use without warping or collapsing. If you’re interested in more advanced reinforcement techniques, explore building seamless storage solutions.
Install Your Storage Solution
Attach your shelf or cabinet to the wall studs using appropriate anchors and screws, making sure to distribute the weight across multiple points for stability. Use a level to ensure perfect horizontal alignment—nothing looks worse than a crooked shelf holding your prized mixer. I remember hanging my first shelf with a spirit level, only to find it off by a fraction; a simple adjustment fixed it instantly. When anchoring, it’s essential to locate studs behind drywall; consider a stud finder if you’re unsure. For detailed installation techniques, visit this resource on built-in storage.
Maintain Accessibility and Flexibility
Design your storage with easy access in mind. Use pull-out shelves or swing-out brackets that allow you to grab your mixer without removing other items. During a recent renovation, I installed a custom pull-out tray that slides smoothly, making retrieval effortless. To ensure longevity, regularly check the hardware and keep mechanisms lubricated with silicone spray—especially if you notice any squeaking. For innovative ideas on maximizing your kitchen storage, browse this guide on storage innovations.
Optimize for Safety and Style
Finish your project by painting or sealing the wood to match your kitchen decor, and install soft-close mechanisms to prevent slamming. Once completed, take pride in your customized storage setup, which not only saves space but also elevates your kitchen’s style and functionality. Remember, well-planned storage solutions can make a world of difference in your daily routine, turning a cluttered chaos into organized harmony.
When it comes to designing custom cabinets and implementing innovative storage solutions, many homeowners operate under misconceptions that can hinder the effectiveness of their remodels. A common myth is that more storage always equals better organization, but in reality, the quality and placement of cabinets matter far more than sheer volume. Oversized, cluttered cabinets can become difficult to access and maintain, defeating their purpose altogether. Focusing on thoughtful, intentional design—like integrated pull-outs and smart shelving—ensures you maximize functionality without sacrificing aesthetics.
One critical nuance often overlooked is the material choice. Many assume that cheaper options, such as particle board, suffice for cabinet carcasses; however, experts emphasize the importance of plywood, especially in high-humidity zones, as it resists warping and deterioration over time. Neglecting this detail can lead to costly repairs down the line. Additionally, the myth that built-ins are only suitable for large spaces limits creativity—moderately sized kitchens can benefit immensely from custom, space-saving features like hidden niches or toe-kick drawers.
An advanced consideration involves the correct alignment of cabinet doors and drawers. Small misalignments, undetectable at a glance, can cause long-term issues like creaking, uneven gaps, or difficulty closing. Using high-quality, adjustable hinges and gaining precision during installation can prevent these common pitfalls. Moreover, the misconception that standard finishes are adequate often results in finishes that fade or show fingerprints quickly; investing in matte or specialized coatings can maintain your cabinets’ beauty for years.
Have you ever fallen into this trap? Let me know in the comments.
### How do I balance aesthetics with everyday function?
Achieving harmony between a sleek appearance and practical usability requires deliberate planning. Incorporate features such as soft-close hinges and deep drawers for pots and pans, ensuring ease of use while maintaining a polished look. External links to curated resources on [custom cabinet ideas](https://artisancabinetworkz.com/custom-cabinets-ideas-that-transform-your-homes-style) can help you explore options that blend style with function.
A detailed understanding of these nuances can profoundly impact your remodel’s success. By paying attention to material selection, hardware precision, and innovative design features, you make smarter decisions that stand the test of time—turning your kitchen into a truly functional masterpiece. For more expert tips, visit [the ultimate guide to custom cabinets](https://artisancabinetworkz.com/the-ultimate-guide-to-custom-cabinets-for-a-stylish-kitchen-overhaul). Remember, thoughtful design is the cornerstone of a truly transformed space.Maintaining your custom cabinetry and built-in storage solutions over time requires more than just initial craftsmanship. The right tools, regular upkeep, and strategic methods ensure your investment pays off for years to come. Personally, I rely on high-quality lubricants like silicone spray for hinges and slides, which prevent squeaking and keep mechanisms smooth. For precise adjustments, I swear by a digital level, which allows me to fine-tune door alignment with pinpoint accuracy—avoiding uneven gaps and creaks that can develop as years pass. Additionally, I use a soft-bristled brush and microfiber cloths to regularly clean dust and debris from hardware and delicate wood surfaces, preserving the finish and preventing buildup that could impair movement.
Thinking ahead, I also keep a small toolkit stocked with hex keys, screwdrivers, and spare hardware components. This proactive approach helps me handle minor repairs promptly, avoiding more costly renovations later. Future trends in maintenance suggest increased integration of smart, self-oiling hinges and climate-adaptive finishes that respond to humidity changes, further reducing long-term issues. For now, however, choosing products like corrosion-resistant hardware and sealing wood surfaces with durable finishes are your best bets.
How do I maintain my cabinets over time?
Routine inspections are key. Regularly check for loose screws, misaligned doors, or signs of swelling or cracking. Applying a protective finish annually can also help keep the wood looking vibrant and resisting moisture damage. When I noticed my cabinet doors starting to sag, a quick adjustment with my screwdriver and a touch of lubricant instantly restored their function. Remember, if you want to keep everything working smoothly, investing a little time and effort regularly can save you from expensive fixes down the line. For a more detailed look at hardware choices that endure, visit this insightful guide. Now, I challenge you to implement a monthly check of your cabinet hardware using a quality lubricant—your future self will thank you. As technology advances, similar tools for automated maintenance may become standard, but until then, hands-on care remains essential.
The Unexpected Pitfalls of Overconfidence in Design Choices
One of my biggest lessons was realizing that assuming materials and hardware could be interchangeable often led to costly mistakes. I once opted for budget-friendly hinges without considering long-term durability, only to find them squeaking after a few months. Patience and thorough research before making final decisions saved me from repeated frustrations. This experience taught me the importance of investing in quality components from reputable sources.
Why Overlooking Small Details Can Sabotage Your Remodel
It might seem insignificant, but tiny misalignments or mismatched finishes can detract from the seamless look you desire. I learned that double-checking measurements multiple times and consulting with experts helped avoid these pitfalls. Small details, like choosing the right cabinet filler or ensuring consistent grain direction, elevate the overall aesthetic and functionality of your kitchen remodel.
Curated Tools for a Smooth Remodeling Experience
Throughout my journey, certain tools became indispensable. A high-precision digital level allowed me to install cabinets perfectly flat, reducing future alignment issues. A quality mitre saw ensured clean cuts, saving time and rework. Additionally, a detailed project planner helped keep track of materials, deadlines, and budgets, making the entire process more manageable. I highly recommend exploring these tools to streamline your own upgrade.
Believe in Your Design Voice and Make It Happen
Remodeling a kitchen with custom cabinets isn’t just about aesthetics; it’s about creating a space that feels uniquely yours. Embrace the learning curve, be willing to adapt, and celebrate the progress along the way. Remember, the effort you invest now results in a kitchen that enhances your daily life and future memories. So, take that first step confidently—your dream space is within reach.
Have you encountered unexpected challenges during your kitchen remodel? Share your story below—I’d love to hear your experiences and tips!