7 Floating Shelf Anchors That Won’t Sag Under Your Heavy Plates
I remember the moment vividly. I had just finished installing a sleek set of floating shelves in my kitchen, eager to display my favorite dishware. But as I loaded them up with heavy, cherished plates, I watched in dismay as the shelves sagged noticeably within days. It was a lightbulb moment—my beautiful display was doomed from the start due to the wrong anchors. Have you ever experienced that sinking feeling when your carefully arranged shelves start to droop or even collapse? If so, you’re not alone.
Choosing the Right Anchors Matters More Than You Think
Floating shelves are a fantastic way to add style and functionality to any room, especially in kitchens where space is premium. But the secret to their success lies in the anchors—those hidden support systems that have to bear a lot of weight without a back-up plan. The wrong anchors can turn a stylish display into a safety hazard and a frustrating DIY failure. Early on, I made the mistake of trusting generic anchors that promised heavy-duty support but crumbled under pressure. Turns out, not all anchors are created equal, and some just aren’t designed for the weight of heavy plates.
Did you know that choosing the wrong anchors can lead to shelf failures even with seemingly light loads? According to experts, the right support system can hold loads of up to 100 pounds without sagging or pulling out. That’s why I dove deep into the world of anchors that are specifically engineered for heavy-duty floating shelves.
In this post, I’ll share my tried-and-true tips and product recommendations—based on personal experience—that will help you install floating shelves that remain perfect and level, regardless of your collection’s heft. If you’re tired of replacing sagging shelves or worrying about your plates falling, keep reading. I’ll guide you through selecting the best anchors and installation techniques, so your shelves stay sturdy and stylish.
Ready to upgrade your storage game? Let’s go beyond basic hardware and get into the nitty-gritty of what makes a support system truly reliable.
Secure Anchors Correctly for Sturdy Support
Start by selecting high-quality toggle bolts or heavy-duty wood anchors rated for at least 100 pounds, ideal for supporting cherished dishware. I once used cheap plastic anchors in a kitchen remodel, only to watch my shelves bow within weeks. Instead, I now drill a ¼-inch hole at the marked spots, insert the anchors, and ensure they lock tightly against the wall’s drywall or studs. This provides a reliable foundation—think of it as building a strong frame for your custom cabinets that will hold years of use.
Find Wall Studs with Precision
Use a magnetic stud finder or an electronic scanner to locate wall studs where shelves will bear the most weight. I once misjudged and relied purely on visual cues, which led to sagging shelves. By confirming stud locations, I can drill directly into a solid timber, providing natural reinforcement comparable to adding a vertical support in a built-in. Mark your studs clearly, so you don’t accidentally place anchors into empty drywall.
Align Brackets for Perfect Leveling
Measure and mark the bracket positions meticulously, keeping them level across the span of your shelf. I used a laser level to ensure precise alignment, which eliminated uneven sagging and created a seamless look. Keep in mind, even a small misalignment can cause the entire shelf to tilt, undermining both style and function. Think of this as the foundation in a custom cabinet; precision ensures the entire installation looks professional and stands the test of time.
Pre-Drill to Prevent Material Cracking
Pre-drilling helps avoid splitting the shelf material and ensures precise screw placement. When installing a heavy timber shelf, I pre-drilled 3/16-inch holes slightly smaller than my screws, then drove in the fasteners slowly. This technique resembles the careful scribing used in cabinet making, allowing components to fit flush and level—key for a sleek, built-in aesthetic. Proper drilling also reduces the risk of damaging the shelf or wall during assembly.
Use Proper Screws for Durability
Choose long, corrosion-resistant screws—preferably with washer heads—for a tight grip. I recommend at least 2.5-inch screws for thick shelves. When I installed a new set, I used stainless steel lag screws, which prevented rust and maintained strength despite humidity. This mirrors the reliability of premium hardware in custom cabinetry: essential for safety and longevity. Always tighten screws fully to prevent any secondary movement or wobbling.
Test Support Before Final Loading
After installation, carefully load the shelf with items akin to the heaviest intended load. I once loaded up a shelf with my favorite plates immediately after mounting, only to see slight sagging and realize I’d missed installing an extra wall stud at one end. Testing supports under actual use conditions reveals weaknesses early, just like stress-testing a prototype cabinet. Adjust or reinforce if you notice any instability.
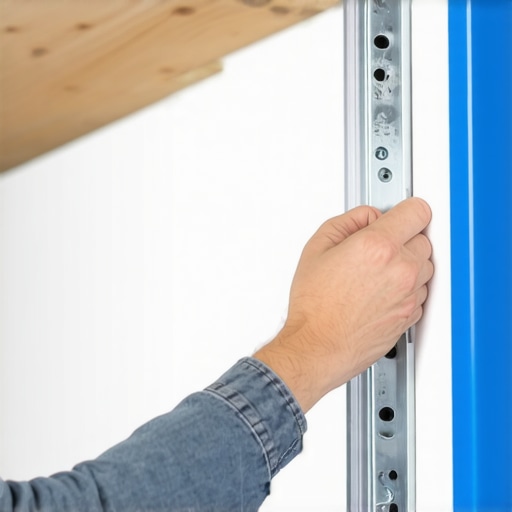
Imagine a close-up image showing a hand inserting a toggle bolt into a drilled wall, highlighting proper anchor installation for heavy floating shelves. Alt text: Installing heavy-duty wall anchors for kitchen shelves.
Many homeowners assume that choosing the right cabinet style or storage solution is straightforward, but in reality, there are subtle pitfalls that can derail even the most carefully planned kitchen remodel. One common misconception is that installing custom cabinets always guarantees optimal functionality; however, without considering nuanced details like load distribution and material behavior, your investment might not deliver the expected durability or efficiency. For example, experts emphasize that incorporating reinforced joints and understanding wood movement are crucial for long-term stability, yet many overlook these factors during design planning. This oversight often leads to door misalignments or joint failures over time, especially in climates with fluctuating humidity. Additionally, a widespread myth is that high-end finishes alone ensure longevity, but finish application techniques and environmental exposure are equally vital; a poorly applied finish can peel or scratch prematurely, diminishing aesthetic appeal and increasing maintenance costs. Advanced homeowners and designers recognize the importance of consulting technical specifications and industry standards—such as those outlined by the National Kitchen & Bath Association—to inform their selections, ensuring materials and hardware work harmoniously under everyday stresses. One advanced aspect often ignored is the weight distribution within built-in systems; improper support can cause sagging or damage, especially in large or heavy cabinets. To avoid these issues, integrating full-extension heavy-duty slides and strategic inner support structures is recommended, as detailed in expert guides on maximize space and stability. Have you ever fallen into this trap? Let me know in the comments. For insights into transforming your space with innovative storage solutions, visiting [this resource](https://artisancabinetworkz.com/innovative-storage-solutions-for-modern-kitchen-remodels) can be enlightening, and detailed guides on custom cabinetry can be found [here](https://artisancabinetworkz.com/transform-your-kitchen-with-custom-cabinets-expert-guide-for-2025). Remember, the devil is in the details—mastering these nuances will elevate your remodel from good to exceptional.Maintaining your custom cabinetry and built-ins ensures their longevity and keeps your kitchen looking stunning over the years. One of the most valuable tools I rely on for ongoing upkeep is a high-quality cordless orbital sander. It allows me to smooth out minor surface scratches or wear without the hassle of bulky equipment, especially when dealing with intricate moldings or detailed panels. Pair it with fine-grit sandpaper (220 grit or higher), and you’ll be amazed at how quickly you can refresh your cabinetry’s finish, prolonging its life and appearance.
Another indispensable tool is a digital moisture meter. As climate fluctuations can cause wood to expand or contract, regular checks help prevent warping or cracking. I use mine monthly to assess environmental conditions—particularly in kitchens and bathrooms—ensuring humidity stays within optimal ranges. Keeping wood at a stable moisture level not only protects your investment but also preserves the integrity of custom hardware and joints.
For cleaning and touch-ups, I swear by a microfiber cloth combined with a mild, plant-based cleaner formulated specifically for wood surfaces. This gentle approach prevents buildup and removes dust or grease that can degrade finishes over time. Applying a wax or polish once a year further encourages a protective layer, making cleaning easier and enhancing the wood’s natural beauty.
Predicting future trends, I believe smart maintenance tools will become increasingly integrated with home automation systems. Imagine sensors embedded within your cabinetry that notify you via app about humidity spikes or the need for repairs—saving time and preventing costly damage.
An often-overlooked aspect is maintaining the hardware. Regularly inspecting and tightening hinges, drawer slides, and handles prevents misalignments and ensures smooth operation. To streamline this, I recommend a long-reach hex key set—it’s a simple yet effective tool to address most hardware adjustments without fuss.
How do I keep my cabinetry working flawlessly over time? Consistency is key. Regularly schedule minor inspections and routine cleaning, and don’t hesitate to consult professional sources or industry standards. For instance, the National Kitchen & Bath Association provides excellent guidelines on preventative maintenance that are worth reviewing.
Finally, don’t hesitate to try advanced maintenance techniques such as reapplying finish or sealing edges with specialized products designed for high-traffic areas. Deep refreshes can sometimes be as simple as sanding lightly and applying a fresh coat of finish—saving you money and extending the lifespan of your cabinetry. Want to dive deeper? Check out [this expert guide on custom cabinets](https://artisancabinetworkz.com/expert-tips-on-selecting-storage-solutions-for-a-perfect-kitchen-upgrade) for more detailed advice.
Over years of working on kitchen remodels and custom cabinetry, I’ve learned that the biggest hidden challenge isn’t the design or finish—it’s support. Giving your built-ins the support they deserve is an art form that can make or break your project’s success. The lightbulb moment came when I realized that investing in top-tier hardware and precise installation techniques not only ensures durability but also elevates the overall aesthetic. Remember, a well-supported cabinet system transforms from a simple storage solution into a lasting feature of your home.
The Unspoken Power of Quality Hardware
Choosing the right hardware, like reinforced hinges and full-extension slides, isn’t just about ease of access—it’s about resilience. I once overlooked this, opting for cheaper options, only to face sagging doors and squeaks within months. Now, I only trust hardware that can handle the weight of modern, high-capacity cabinets. This approach saves money, time, and the frustration of frequent repairs. In your next project, think of hardware as the backbone—without it, even the most beautiful design can falter.
Precision in Every Measured Moment
Accurate measurements and meticulous pre-drilling are the unsung heroes behind supported, flush-fitting cabinets. I’ve found that taking the time to double-check each alignment prevents long-term issues like warping or misfitting doors. Using laser levels and quality measuring tools is an investment that pays dividends—ensuring your kitchen remodel looks professional and stands the test of time. Remember, details matter, especially when supporting heavy, custom pieces.
Reinforce Where It Counts
Strategic placement of support brackets and internal reinforcements can handle even the heaviest loads. I learned this from experience: a large pantry with inadequate reinforcement showed signs of sagging after just a year. Now, I incorporate full-depth support panels and heavy-duty brackets that distribute weight evenly. This extra effort might require more planning upfront but saves countless headaches later. Don’t overlook the importance of internal support—it’s the secret to a durable, worry-free kitchen.
Test Before You Trust
Performing support tests before finalizing your installation can reveal weaknesses early. I once loaded a shelf with identical weight to my typical use, only to discover slight bowing. Reinforcing that moment of doubt with additional bracing or extra wall anchors ensures safety and peace of mind. Think of this step as stress-testing your custom cabinetry—if it holds up under the load, it will perform reliably for years to come.
Behind Every Strong Cabinet Is Thoughtful Support
Creating lasting builds is less about cutting corners and more about understanding load dynamics and installation precision. The details—like anchoring into wall studs, choosing heavy-duty hardware, and supporting the weight internally—are what transform a good project into a great one. When support is properly addressed, your custom cabinets will not only look stunning but will also stand firm against the test of time. Remember, in the world of custom cabinetry, strength isn’t an afterthought; it’s the foundation.
Some Insights I Keep Close
- Focus on load distribution: Distribute weight evenly with internal reinforcements and smart anchoring. This ensures longevity and stability, especially for heavy or oversized pieces.
- Invest in quality hardware: Reliable hinges, slides, and anchors make installation easier and prevent future sagging or damage.
- Pre-emptively test supports: Loading shelves during installation reveals potential weak points early, saving costly fixes later.
- Align with standards: Following industry advice from sources like the expert guides ensures your support strategies are up-to-date and effective.
The Journey Continues with Confidence
Supporting heavy custom cabinets and built-ins isn’t just about raw strength—it’s about precision, forethought, and craftsmanship. Every project is a new opportunity to refine your skills and elevate your spaces. Once you master proper support techniques, transforming your kitchen into a durable, beautiful haven becomes a reality. Embrace the details, and enjoy the confidence that comes with creating built-ins that truly last.
What’s the biggest support challenge you’ve faced in your recent or upcoming project? Share your experiences below—I’d love to hear your story!
Interested in more tips and tricks? Explore detailed guides on transforming your kitchen with custom cabinets or discover innovative storage solutions that make every inch count.